

I thought about using a sofa table along the chalkboard wall. See the length of the wall? It's definitely long enough.

I had the one I found in the dumpster (read about it here) by my front door - it was perfect with the shelf underneath, the width of it, the length...

so I moved it into the kitchen to try it out...
Oh no! It blocked the area going into the laundry room. You can see from the old photo below how the door sits between the end of the cabinets and the chalkboard wall.

With the sofa table there, I had to squeeze past it to get into the laundry room. I guess the length wasn't perfect. Now what do I do? I searched stores for a table the correct width and length. I didn't find much and what I did find was too flimsy.
Then I saw this on Pinterest:
 |
| source |
Of course, it sparked an idea - I would just make my own! I measured how long it needed to be making sure the passage to the laundry door wasn't blocked, then figured out how tall I wanted it.
Armed with that info, I headed to my local Lowe's and Home Depot to get supplies. A pine board ( I had them cut into 3rds for me), four 18" pipes, four 8"pipes, 16 floor flanges, four 3" metal casters, and screws.
I sanded then stained my boards. Love the rustic look of them! And Bruce added a plug to the wall.

We wiped down the pipes with Mineral Spirits to get the grease and grime off. After the boards dried, Bruce assembled the cart. I love those wheels!

We wiped down the pipes with Mineral Spirits to get the grease and grime off. After the boards dried, Bruce assembled the cart. I love those wheels!

Once in the kitchen, I put the Keurig, coffee pot, coffee filters and my red rooster creamer on the top shelf:

On the middle shelf, I used an old wooden soda crate and put the K-cups on one side and the coffee and teas on the other side. I even have enough room for some coffee cups...

Coffee cups added:
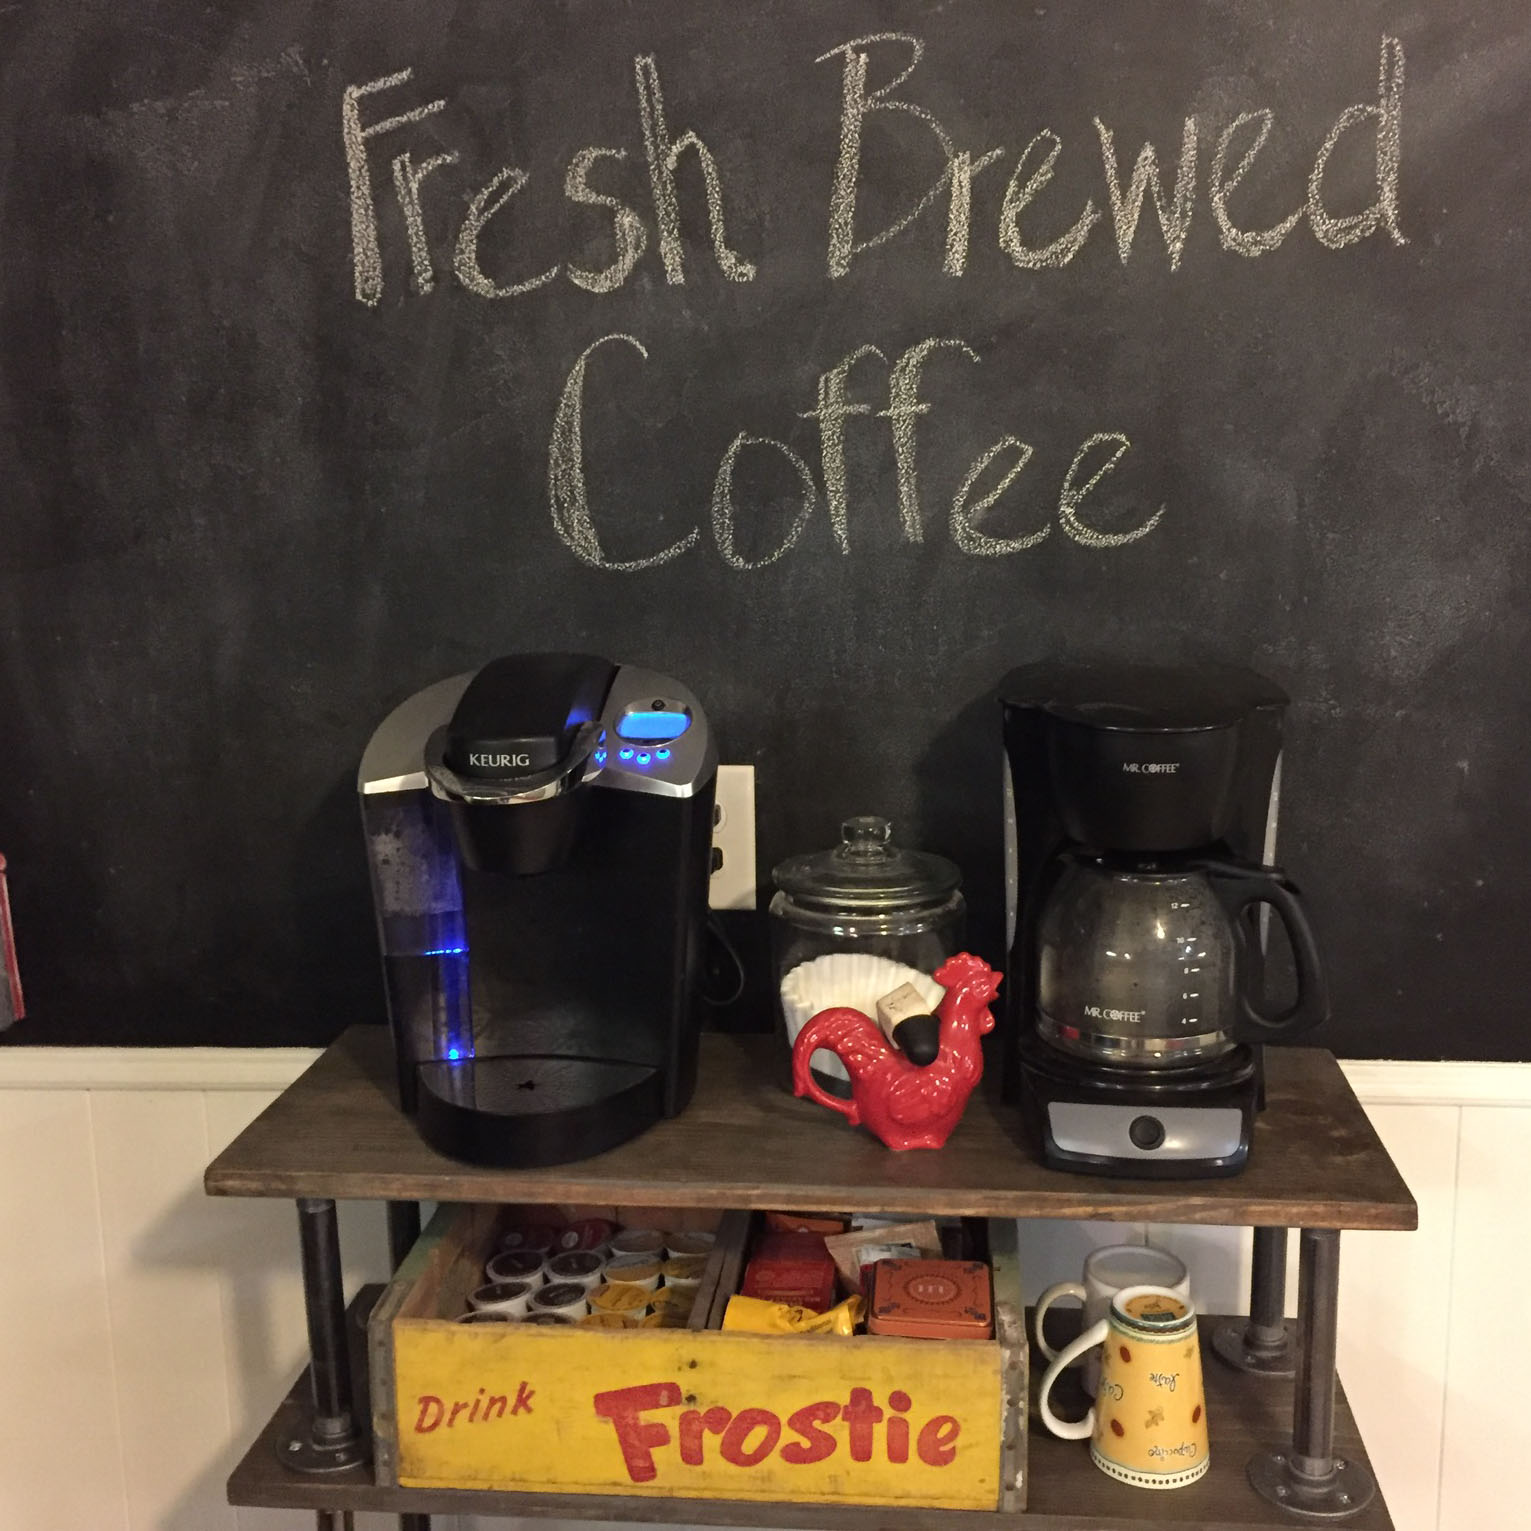
The bottom shelf holds my magazine rack turned cookie sheet holder. I really love how my industrial cart turned out - it's the perfect size for the spot!

As you can see, it doesn't block my way into the laundry room:

I now have a clear counter top next to the sink - I put my bottle drying rack there and loaded it up with my coffee cups (added bonus - more room in the cabinet!):
 The blue bowl in the center belonged to my mother. I can put my tea bag squeezer in there or add ice and a creamer. My mission has been accomplished! Hurray!

As you can see, it doesn't block my way into the laundry room:


One more big project for the kitchen and I'm calling it done. Since painting my lower cabinets, I've decided the doors and drawers are ok for now so that redo is getting shelved until later. But the ceiling - I still want my bead board ceiling - so we're tackling that next. I'm super thrilled with how the kitchen has turned out. I can't wait to share it all with you!


Love the coffee cart! So great that you see a need and roll up your sleeves and get to it! You'll enjoy it every time you drink coffee at The B Farm!
ReplyDeleteThanks, Susan! It wasn't too hard but sure was glad Bruce helped me!
DeleteIt's perfect, Cecilia! Love it! Sharing on FB :)
ReplyDeleteI love this. Pipe furniture is so much fun to make.
ReplyDeleteI love the cart! I have been wanting to build an industrial shelf or cart for a while. I have the perfect little spot for it too. Now to talk the hubby into it. :) I can't wait to see your ceiling!
ReplyDeleteHugs, Vicky
Very clever idea. I love the table.
ReplyDeleteYou are so smart and creative to make this lovely coffee cart! Love it, Cecilia!
ReplyDeleteYour industrial cart turned out so perfect for that spot, Cecilia! Great job!!!I look forward to your kitchen reveal!
ReplyDeleteYou clever girl, Cecelia. This is a great idea and looks terrific in your kitchen. Love this idea!
ReplyDeleteThe cart is awesome and the stain choice is even better. Great way to put all that wake up morning goodness in one space. Well done!! I love that laundry room door too.
ReplyDeleteCarole @ Garden Up Green
Thanks, Carol. It's pretty perfect if you ask me! The laundry room door used to be a very beat up hollow core door. I found this one, scrubbed the peeling paint off then frosted the glass. Much better! Adds character to an otherwise so-so spot. :-)
DeleteCecilia, this is SO cute! Maybe industrial isn't supposed to be cute, hmmm? But I really like it. You guys are so handy! Are you enjoying this cooler weather as much as I am !
ReplyDeleteWow, that turned out great! I love your laundry room door too!
ReplyDeleteTania
This industrial cart is just what your kitchen needed...it looks awesome.
ReplyDeleteI love it! You're so resourceful and creative Cecilia, and really know how to reuse items to their full advantage and make your home shine.
ReplyDeletexxx
Perfect for that area, Cecilia ... good looking shelf too. Great job you and Bruce did. Your laundry room door is priceless ... love it!
ReplyDeleteAudrey Z. @ Timeless Treasures
Nicely done! This is so creative and so appealing:)
ReplyDeleteMorning joy is now presented in such a fabulous fashion!
Hugs,
Jemma
Your industrial cart is fantastic and the fact that you built it yourself is too. Looks perfect in your kitchen.
ReplyDeleteThank you, Sharon. It was actually pretty easy to make. I'm really happy with it!
DeleteThank you for sharing your fabulous cart @Vintage Charm--you know how much I love it ;) Pinned!
ReplyDeleteI love your coffee car cart!!! It is perfect and I am sure very functional. Great design. I may have to make one for myself one day. Thank you so much for sharing. Hugs, Beverly http://teacottagepretties.blogspot.com/
ReplyDeleteThank you Beverly! It was pretty easy once we figured out the placement of the flanges. I love the industrial look too!
Deletenice
ReplyDelete