Showing posts with label farmhouse. Show all posts

Monday, September 13, 2021

Fireplace Refresh: Giving It Farmhouse Charm

Here's a project we did before we moved full-time to the farm. At that time, I had quit posting in my blog so I didn't get to share it here.

Here's what the living room looked like when we bought our property in 2012. It was all panel except for the fireplace wall which was all brick. The mantel was not only way above the fireplace insert, but ugly as well.

Even though I painted all the paneling a soft white, the room still felt dark and dated. The height of the mantel made it hard to decorate as objects had to be under 23". Most things did not show up well against the brick.

We kicked around the idea of painting the brick but we really didn't want to do that. Then I saw a blog post where someone added shiplap to their brick fireplace wall. I can't remember who it was but I immediately knew that was the perfect look for our farmhouse. I showed Bruce and he agreed to try it. The first thing to go was that ugly mantel.

Then Bruce cut off the brick supports:
We decided it would look good to leave some brick showing not to mention it would be a heat barrier. The bottom rows went on easy.
As we got to the longer pieces, we started running into problems with the boards bowing. I suggested Bruce cut them into shorter pieces, staggering the joints. That helped and the rows continued to go up. I was getting excited about how it was looking.
Finally, the shiplap was all up. It already looked amazing!
My turn now. I primed the wood planks.
Then painted them the same white as the trim in the room. Wow, what a difference - the room was so much brighter!
Bruce make the new mantel with walnut boards that came from trees on his grandparents' farm in Arkansas. It got a simple clear coat to bring out the richness of the wood.
Yay! There is finally room to hang a painting. We chose to hang my train painting as it is one of our favorites.

We are so pleased with how this project turned out. The room is not only brighter but it no longer looks like it is stuck in the 80's. And since we closed in the garage to give us a bigger living room, this room is now the office and library. I had to snap a quick picture - things are a little messy (keeping it real) but it is a cozy spot. 

I still love how it looks 3 1/2 years later. Makes me wish we would have done it sooner!

Next time I'll be sharing how I updated these six old metal lawn chairs. My grandparents had some on their front porch and I always wanted some. I've been collecting them - most came from Canton's First Monday Trade Days - one Bruce actually found on the side of the road. We use them around our fire pit.
Five of the chairs...there's a yellow one as well. 


They are in need of cleaning and repainting so I'm busy working on them. It's turning out to be quite the job as most have peeling paint and some rust. The black one is all sanded and primed and I cleaned the rest of them. I just need to get them sanded and primed too before they get their new coats of paint. Hopefully, I'll be done next week.

Cecilia


Wednesday, August 4, 2021

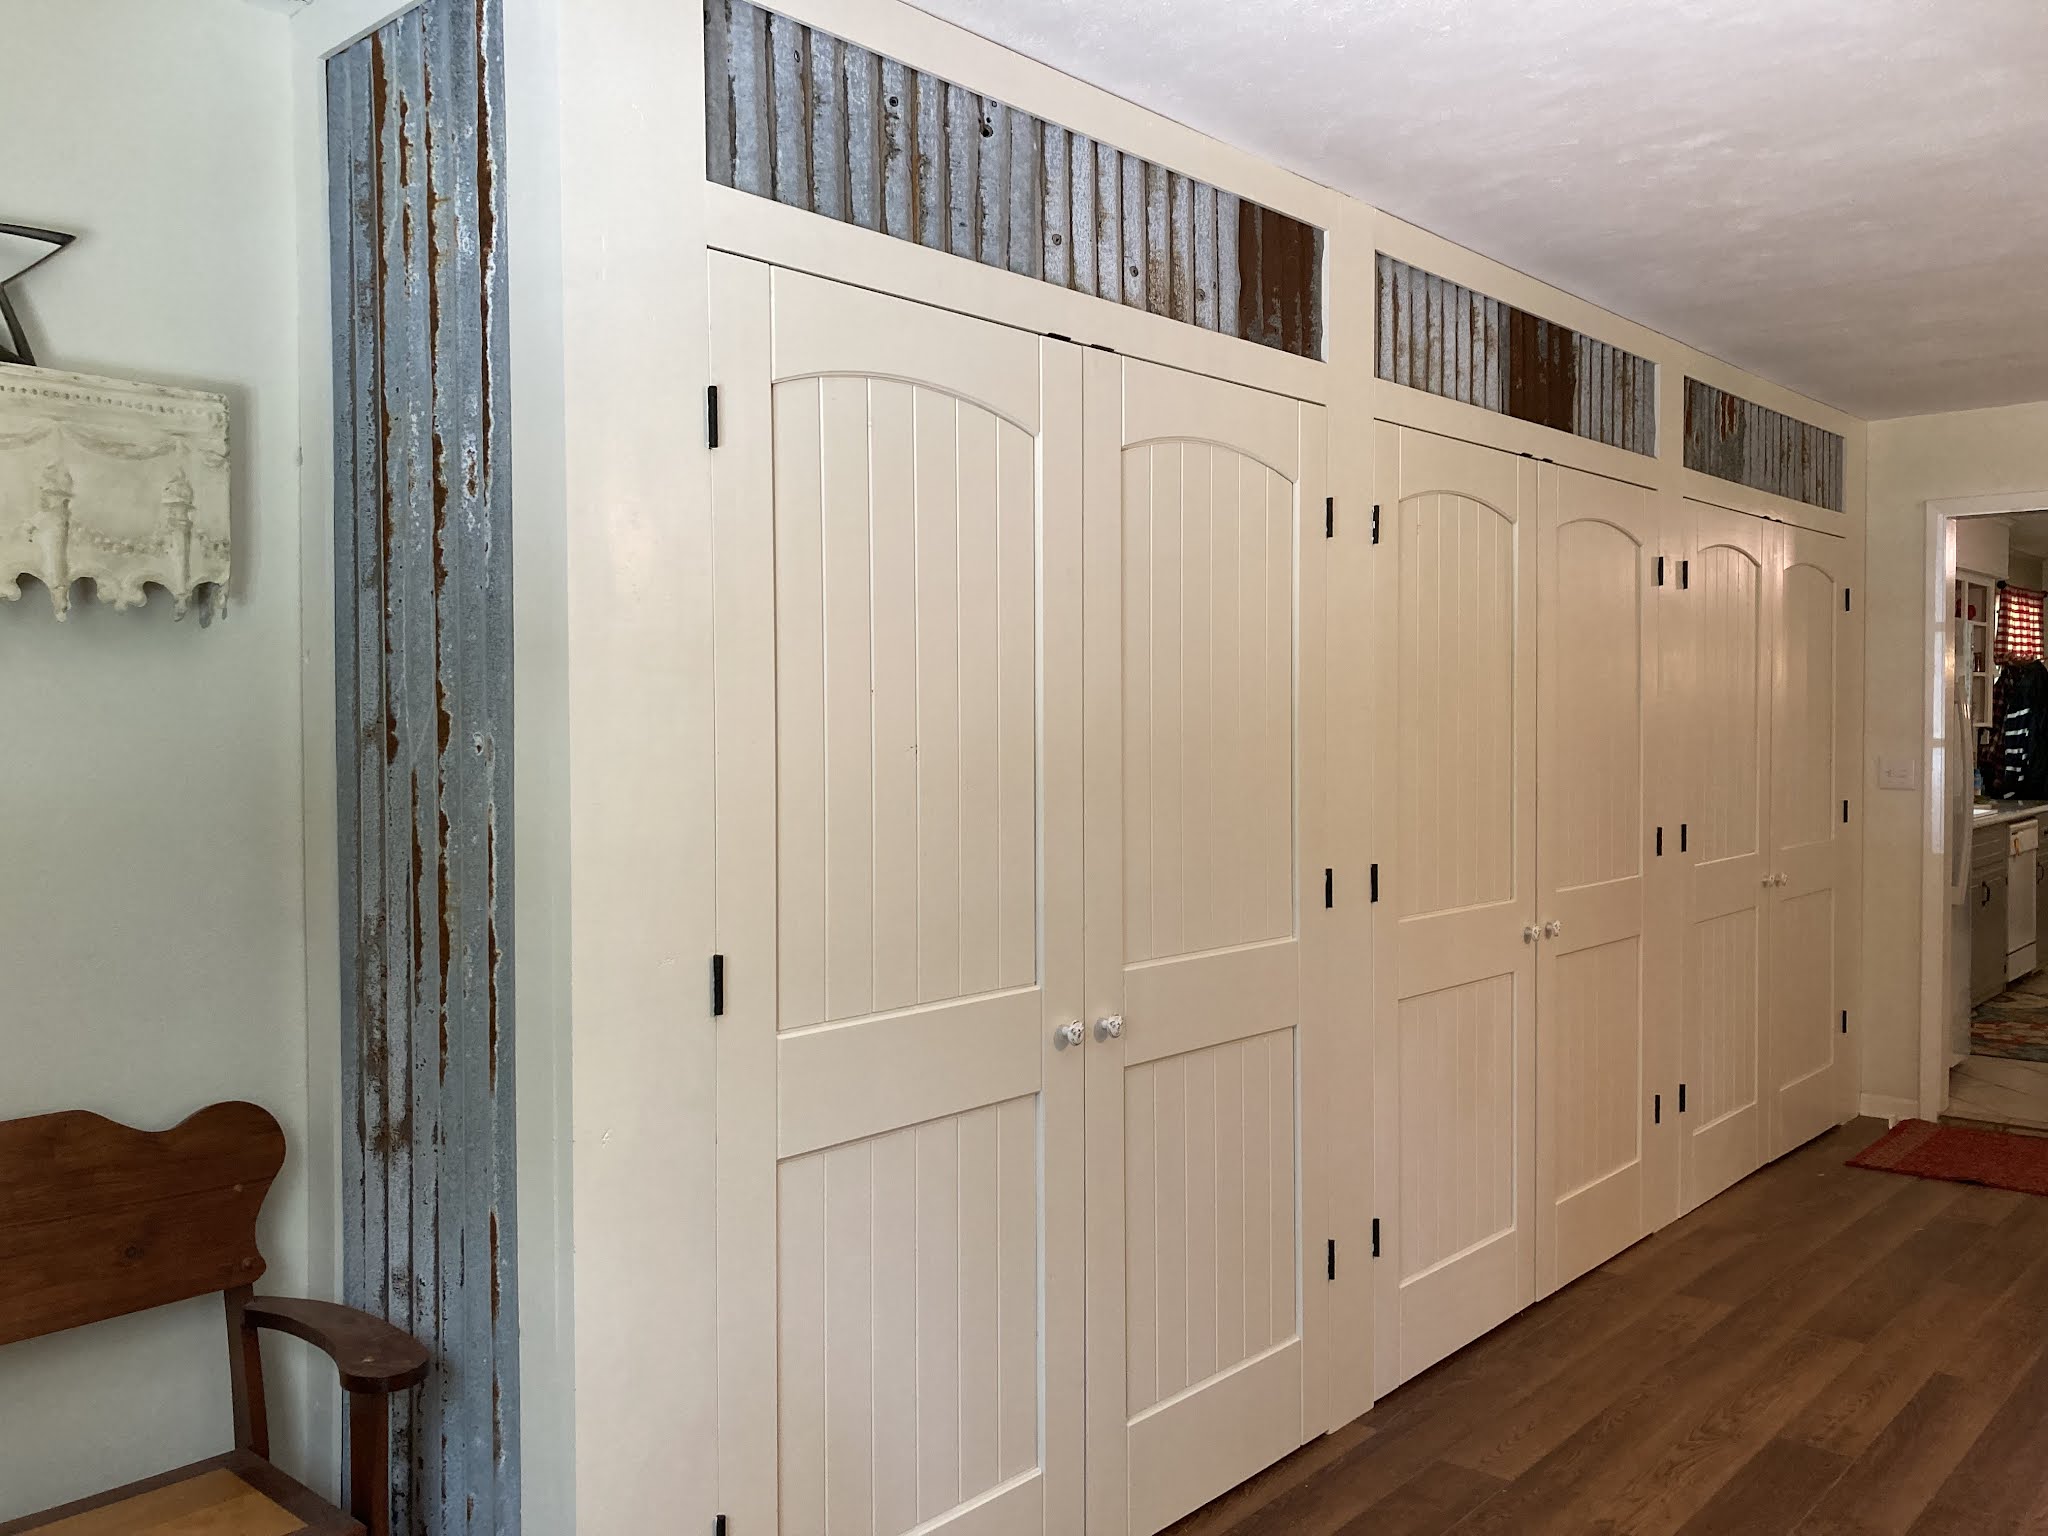
Cottage/Farmhouse Storage Closets

 Today, I'm finally sharing the storage closets. There'a quite a few pictures so hang in there.

By the time we got the garage turned into our new living/dining room, we were worn out. We still had all the Christmas boxes and some other things piled along the long wall where we intended to build cabinets or closets. 

We weren't sure what we wanted - cabinets? closets? What should they look like? I spent lots of hours going through Pinterest trying to find something we both liked. A month went by, then two. Then before we knew it, it was a year. Ugh. I was so tired of seeing boxes along the wall!

Bruce told me he'd found some doors at the salvage place in the town just north of us. Off we went to check them out. Oooooo! Pretty! They had just the look I wanted - cottage-y and beadboard! They definitely tipped the scales in favor of closets. We bought six of them.

Not sure you can tell but the doors have a 
beadboard inset


First we had to move all the stuff out of the way


Just about ready to start!


Building the framework


Hanging the doors


More doors are up!


Finally all the doors are hung!


What are we going to do to close in the gap? I have an idea if I
can get Bruce to agree!


Painting the doors - I used my handy HomeRight Finish
Max paint sprayer. I love it; it's so easy to use! Herbie is 
making sure I'm doing it right.


Rusting tin - I have a special use for it in mind.


We found bee knobs at Hobby Lobby. 
How perfect! And you can get them 1/2
off every other week!


The knobs look great on the doors.


Are you ready to see how they turned out?

Ta-da! We put the tin in the gaps above the doors and finished off the end of the closet with it as well.


We left a spot at the end for a bench. I still need to finish that 
area but that will be for another time.


Of course, we still needed shelves so after some discussion, we came up with a plan. In the first section, we put in a coat closet and small wire shelves for small items.


Behind the second set of doors, Bruce built long shelves to hold all the Christmas boxes and decor.


All the Christmas stuff and I still have room!


In the last section, other than a shelf for the modem, we didn't put up any shelves. That allows us to put tall stuff in there. Bruce might do something once he goes through his boxes though.

Getting ready to add modem shelf


One last look at the finished closet! I love how it turned out. Cottage-y with a touch of farmhouse. Now we don't have to look at boxes along this wall anymore. Yippee! 


I hope you enjoyed seeing our process. It was a lot of hard work but the end result is so worth it. I love how we are making this little house ours. It's come a long way, baby!

See you next time!
Cecilia

Monday, June 25, 2018

Week One: Living Room Refresh

Once upon a time, we bought a farm with a small ranch-style house. It needed cleaning and paint and some updating - which we've been steadily doing for the past 6 years, getting it ready for the some day move there full-time day. In the meantime, we enjoy getting away on weekends and occasionally a week at a time.

 One space I've struggled with is the living room - it's tiny...11x14' tiny... with a huge angled fireplace that eats up lots of space.

I call it cozy and I've done my best using second hand finds to make it comfortable BUT the decor has never felt quite right. I rearranged the furniture several times and finally hit upon what I feel was the best layout.

And yet it still felt off. So I enlisted the help of my friend KariAnne of Thistlewood Farms. She's brilliant. We talked and discussed my likes and all and she came up with a wonderful plan.

Use red. Lots of it. With wood accents. And a bigger rug. With a touch of blue. Here's the mood board she put together for me.

I ran with it. The rug is ordered and on it's way. (I found one I think will be perfect).

I made new pillows. All of them with red.

I have material to turn the miniblinds into a roman shade - And it has red too. My color- loving heart is very happy!

And we're taking the beast from the art room and turning it into an entertainment center for the tv. Bruce will have to do some modification on it then I'm going to paint it to refresh it. (Right now it's pretty ugly but the size is perfect for the space).
Sorry about the poor quality picture. It. seems this is the only photo I have of the beast.

I'm excited. It's going to finally looked pulled together using furniture we already have.

And that fireplace that takes up one whole wall? It's possibly getting a makeover too. I can't wait.

*If you need help with your spaces, you can find KariAnne over at her wonderful blog Thistlewood Farms. But if you want to jump right into decorating, may I recommend her super cute, super helpful DIY Home Planner book?

It's like having KariAnne with you each step of your decorating journey plus it helps you keep track of all your decisions as you go. (I have one and I've been busy putting samples and fabric swatches in it, sketching floor plans out, and so on. I wasn't asked to mention her book, but I really do find it extremely useful when planning your home decorating. And did I mention cute?).

Next week, I'll be talking about the rug and pillows. Be sure to hop back over to see what I ended up with.

Saturday, January 20, 2018

Enjoying Snow At The Farm

Last weekend we were going to stay in the city - we had a family get together at my mother-in-law's Saturday to go to. But as we looked at the forecast,  snow plus very cold temperatures were headed for the farm. So after we left Bonnie's, we packed up and headed to the farm to take care of things. The weather was still mild on Sunday but Monday that all changed!

Not only did it snow; we had temperatures way below freezing!
The road to our driveway
up the driveway
Bruce brought the beehive into the garage to protect the bees as much as possible. They've been struggling so we want to give them as much a chance as we can for them to survive.
road to the pond...it actually froze
I loved seeing snow at the farm! It was so pretty!

(yes, I still have pumpkins in the flowerbed...guess it's time to throw them away. ha.)
 But it was so cold! Tuesday it stayed in the 20's and Wednesday morning it was 9 degrees! Say what?


Tuesday after walking around in the snow, I played with decor in the house while enjoying a warm fire.Tin star candle holders and greenery plus rusty snowflakes on the mantel are so pretty. Those stars are perfect for the farmhouse!

The stars along with the flameless candles came from Twigs in Canton.  The candles really look real! They come with a remote too which is so nice! 

Love my snowy plates with deer. I've had the fawn figurine since I was a little girl.

One of the cute birds from Kris at Junk Chic Cottage is dressed perfectly for this winter weather.

I styled my dough bowl with a cute snowman on a sled.


An enamel bucket also from Canton filled full of large rusty bells looks very farmhouse-y on my vintage yellow step stool.

I set up a hot chocolate station so we could have something nice and hot to drink after enjoying the snow! The platter is actually a Christmas one but it goes well with the snowman mugs so it got to stay.

I placed my cotton stems in a tarnished silver pitcher.


Thankfully Wednesday, the sun came out melting the ice and snow so we could head back to the city. I don't think my fountain thawed out very quickly though.

As for the cold weather, we're back in the 60's today. And that, my friends, is why I love Texas! We can have snow and enjoy it but we aren't stuck with it. :o)

How's your winter going?

Springtime Projects 3: Have A Seat!

It might still be Spring, but here in Texas, things are starting to heat up and feel like Summer. I knew I needed to get the last of my Spri...