Monday, October 21, 2013

Bread Box Charging Station

I finally took the plunge. I went to an Annie Sloan Chalk Paint class and came out of it in love. I wanted to buy one can of every color but instead I had to settle on getting one (it was stressful trying decide what color! ) and a can of wax. This stuff is fabulous, beautiful, fun to work with, and I can't wait to try it out on a big piece of furniture! ( Disclaimer - I am not being paid to say this).

That said, I don't have a large piece of furniture to paint right now. So, I looked through my pending projects and decided to start on this:


A nice big bread box I got at GW (Don't remember the exact cost but it wasn't much)

I wanted to make a charging station and thought this one would be the right size.I had cleaned it with Mineral Spirits as it was gummy from ??  I also gave it a light sanding and primed it with Zinsser primer - all before the ASCP workshop. If I'd only known that paint doesn't need a primer coat, I could have saved myself a step. Ah well, it's doubly protected now.

It had an inset:

which I hacked out  removed. I  cut out a piece of thin plywood to fit and then painted with chalkboard paint.


I painted  2 coats of Chateau Grey (the color I finally settled on) on the box, letting each dry then lightly distressed it. Next, I applied clear wax then dark wax. Nice! I'm liking how the dark wax antiques the piece.


I "seasoned" the chalkboard inset with chalk, then glued it in place. Next I took twine and glued it around the edge and wrote my message on the label.


On the back of the breadbox, I cut out a hole big enough for the cords to go through and sanded those edges to remove any rough parts.


For the interior, I cut a piece of foam board to size and covered it with a leftover piece of fabric I had, gluing the edges to the back of the board then put it inside. (It fit snuggly so I didn't have to do anything to it.)

I love how it turned out.The color goes perfectly with my kitchen and it is big enough for my iPad and phone. Plus it helps keep the counter clear of clutter.


It was fun learning the different techniques with the Chalk Paint. I am waiting for the store to get in their sample cans of paint so I can try out some of the other colors. In the meantime, I am looking for something else to paint...hmmm. Maybe my dining table bench or ? Watch out furniture! I've got paint and I'm not afraid to use it!! bwahahaha....
Come join the parties - I'm linking up here this week:
Flusters-creative-muster-linky-party-44
Lavender Garden Cottage Cottage-style-party

Have a great week!
Cecilia

Thursday, October 17, 2013

Book Page Pumpkin Tutorial

Suzan at simply vintagous asked me, little old me! for a tutorial on my book page pumpkin. :o)


I can't believe it...I mean, she could so do this without me telling her how, I'm sure. :o) But, I am honored that she asked though. If you've never been over to her blog, go visit. She is super talented and just a hoot!

Anyway, making this is super easy. You need just a few supplies:

Fake pumpkin ( I got mine at Good Will as I refuse to pay $$ for the ones in the stores )
Book pages -torn into strips and pieces; or you can use newspaper
Modge Podge
Dark brown acrylic craft paint
Small paint brush

Tear up a lot of book pages. I tore chunky pieces and strips. Then cover one side of the book page piece with Modge Podge and place on pumpkin. Smooth out. Continue until entire pumpkin is covered ( I had to do a section at a time otherwise my fingers stuck to the paper and pulled it off). Let dry making sure you do not place the wet part on something it will stick to.  (Oh, I did not cover my stem. I meant to  wrap twine around it but decided I liked how it looked.)

Once you have it completely covered and dry,  it is time to antique it. Place a small amount of brown paint on a paper plate and thin with water. Brush into crevices of pumpkin and wherever else you want antiqued.  Let dry. You can spray with a sealer if you wish at this point. I did not  spray mine.

Super easy!


I foresee this pumpkin getting used in many different vignettes. I think I need to find a few more cheap pumpkins to cover.

Thanks Suzan for asking me how I made it. You made my day! (Ok, that makes me sound maybe just a little bit pathetic, but girl,  I'm honored!)

Next up I will be sharing my first ever experience with Annie Sloan Chalk Paint. I finally, finally took the plunge and boy, did I have fun!  :o) Until then...

Tootles,
Cecilia

Monday, October 14, 2013

October Decor

It's raining...pouring even. So, what's a girl to do?

 Well, bake and decorate of course! It's a good time for Pumpkin Bread so I mixed up a batch and popped it in the oven. I have an hour before it comes out. Yum, yum. This is one of the best recipes I've ever made. A sweet friend shared it with me many years ago. She's moved since then but I remember her each time I make it. You can find the recipe here.

I also decorated with my Halloween stuff. I always have fun decorating for Halloween. I don't do scary...just fun and maybe a little creepy. lol.

First of all, I decorated at the city home:


I used my Party Lite candle holders on the entry table. I also have a framed subway art (you can see the edge of it on the right), a couple of scarecrows, leaf garland, and eyeball plate.

Close up of eyeball plate. I got a .99 cent plate from GoodWill and drew the eyeball and veins on with colored Sharpie pens. Fast and easy!


The mantle I decorated with my owls, glass pumpkins and a BOO banner made from book pages I copied, added letters to, and then printed out. The white plate has "Who's There?" written on it with a Vis-a-Vis pen.

Close up of one of the owls. Isn't he cute?
Fun and cute and not too spooky. :o)

Then at the farmhouse, I changed up the old window on the entry table and added some spookier elements:


Spider web, midnight hour clock, Boo chalk message plate, raven on window, pumpkins, creepy cloth (I found it at Wal-Mart last year)

In Noir style:

Some close ups:


Holey pumpkin with mice...eek!


 GW pumpkin covered in book pages and antiqued.

The mantle also got an update, again with GW finds - plates were 3/$2.99 -   candle sticks - which got a fresh coat of paint- and pumpkins that came from the dollar section at Target:


Lastly, I put out this fellow:

 I got him many years ago when Bruce and I first got married. Back when ceramics were popular you could find all sorts of things to paint. I had them pour this for me and picked him up still damp so I could cut the eyes, nose and mouth and a hole for the cord to go thru. After he got fired, I glazed him inside and out, fired him again. I then added a flickering lightbulb to the inside. I can't believe he's survived all these years. He still makes me smile:


So I'm all ready for the Spook-tacular holiday. Come November, it will all get changed to Thanksgiving decor. :o)

Hmm, the pumpkin bread is done and calling my name...


Linking with these great parties:
The Dedicated House. Make-it-pretty-monday-week-71
French Country Cottage Feathered-nest-friday_17

Tuesday, October 1, 2013

Final Laundry Room Reveal and Some Fall Crafts

I put the finishing touches on the Laundry Room this weekend. I made a large clothespin sign from some of my old fence pickets:

I cut out the design using my scroll saw then nailed bracing on the back and painted my letters using the same stencil I used on the curtain.

I hung it above the window and washing machine:

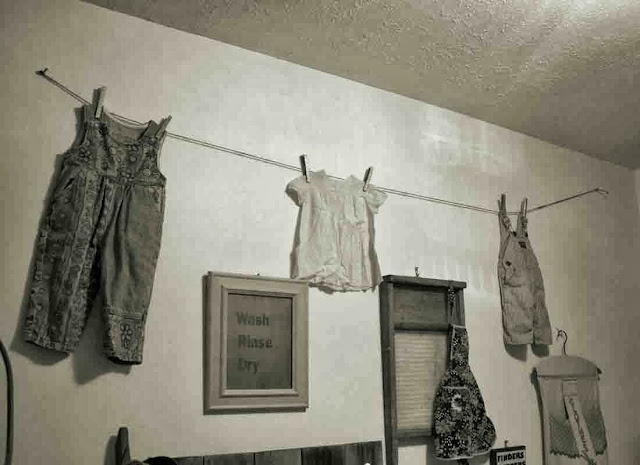
I added a twine "clothesline" and hung one of my childhood dresses on it and also made a shelf  from fence pickets to put above the washer for the laundry soap.


On the long wall, I added another clothesline and hung some of the kids' and my baby clothes...aren't those overalls adorable?


The little apron is mine. My mom made my twin sis and me matching ones with our initial on the pocket. I remember wearing it playing house or helping make cookies.

Sadly, I don't have any of Bruce's baby or kid clothes. I need to ask my mother-in-law if she saved any.

More tweaking:


Then there's my mother's ironing board her dad (my grandfather) made her. The cover was old and dingy so I found this fabulous yellow and grey fabric and made a new cover for it:

I love how it turned out.

Finally, I took a burlap coffee sack and hung it on the wall next to the door:

yeah, the water heater is still out in plain sight...someday I will make a screen for it. For now though, I'm calling it done! It makes me smile. I just love the new look and how everything is now organized.

On another note, we got lots of rain! We sat on the back porch and just enjoyed it.

The dogs, of course, found a puddle and proceeded to make it a mud puddle hole, which of course turned them into Mud Puppies...


I had to laugh at Buddy's face. He had it buried all the way into the mud puddle - I think he was blowing bubbles. LOL.  He had so much fun...Herbie, in the background, doesn't look too much cleaner.
What do you mean, I can't come in?
Then there are the Fall crafts I've been working on:

One was out of necessity as Herbie thought this was a toy. Poor little pumpkin!

It needed something to cover the missing chunks, so I took some shiny aqua fabric I had, cut a circle and gathered it around the pumpkin and tied it up with twine - there!  All better!
It looks more silver in the picture than it is. I think I may have to cover the other one too as I really like how it looks.

My friend, Susan, sent me a link to a pretty Leaf Pillow. Yvonne's ( from Stone Gable) is stunning! Go check hers out. She has a terrific tutorial!
I asked Susan if she was making me one and she said she thought I was going to make her one. haha! I thought, "ok, why not?" Unlike Yvonne, I had to sew mine but  I had the brown fabric with the twine accent already so I made the cover from it. Then I made the leaves from burlap I also had on hand. I like how it turned out and so does Sue! Now I need to do one for me. :o)
I'm thinking it would look good with the leaves painted in Autumn colors...

Whew! I had a lot to cover! I hope you're still here reading. I have tons more projects to share but I will save those for another post. 

Thanks for stopping by!
:o)
Cecilia

Springtime Projects 3: Have A Seat!

It might still be Spring, but here in Texas, things are starting to heat up and feel like Summer. I knew I needed to get the last of my Spri...